Battery switch on travel trailer function is crucial for managing your RV’s power. Understanding how these switches work – whether rotary, rocker, or digital – is key to preventing electrical issues and maximizing your battery life. This guide breaks down the different types, their installation, troubleshooting, and essential safety tips, ensuring you’re confident in managing your travel trailer’s power system.
We’ll cover everything from choosing the right switch for your needs to performing basic maintenance and troubleshooting common problems. Learn how to safely connect your house and chassis batteries, prevent accidental drain, and extend the life of your batteries. Get ready to become a power management pro!
Function and Purpose of a Battery Switch
A battery switch is a crucial component in a travel trailer’s electrical system, acting as the central control for managing power flow from your different batteries. Think of it as a gatekeeper, selectively directing power where it’s needed. This prevents accidental draining of one battery by another and allows for efficient power management during your adventures.This switch typically manages power from two main sources: the house battery (powering interior lights, appliances, and other 12V systems) and the chassis battery (powering essential vehicle functions like starting the engine).
Understanding its function is key to maximizing your RV’s power and avoiding potential problems.
Battery Switch Operation and Power Management
The battery switch allows you to isolate or connect the house and chassis batteries as needed. In the “off” position, both batteries are completely disconnected, preventing any accidental discharge. In the “house” position, only the house battery powers the trailer’s interior systems. This is ideal when the trailer is parked and disconnected from shore power, ensuring you don’t drain your vehicle’s starting battery.
The “both” position connects both batteries, allowing the chassis battery to charge the house battery and vice-versa, or to draw power from both for high-demand situations. Finally, the “chassis” position isolates the house battery, ensuring that only the chassis battery is used, usually for starting the vehicle. The exact labeling and functionality might vary slightly depending on the specific switch model installed.
Safety Implications of Improper Battery Switch Usage
Improper use of the battery switch can lead to several safety issues. Leaving the switch in the “both” position while the trailer is disconnected from shore power for extended periods can drain both batteries completely, leaving you stranded and unable to start your vehicle. Conversely, leaving the switch in the “house” position while driving could prevent the alternator from charging the house battery, leading to a dead house battery when you arrive at your destination.
Incorrectly switching positions while the system is under load could also cause sparks or damage to the switch itself. Always ensure the switch is in the correct position before starting your vehicle or using high-power appliances to avoid such problems. A regular check of your battery levels is also advisable to prevent unexpected power failures.
Wiring and Installation of Battery Switches
Installing a battery switch in your travel trailer is a relatively straightforward process that significantly improves your RV’s electrical system management. It allows you to isolate your house batteries from the chassis battery, preventing accidental discharge and protecting sensitive electronics. This section will guide you through the wiring and installation process, ensuring a safe and functional setup.
Wiring Diagram for Battery Switch Installation
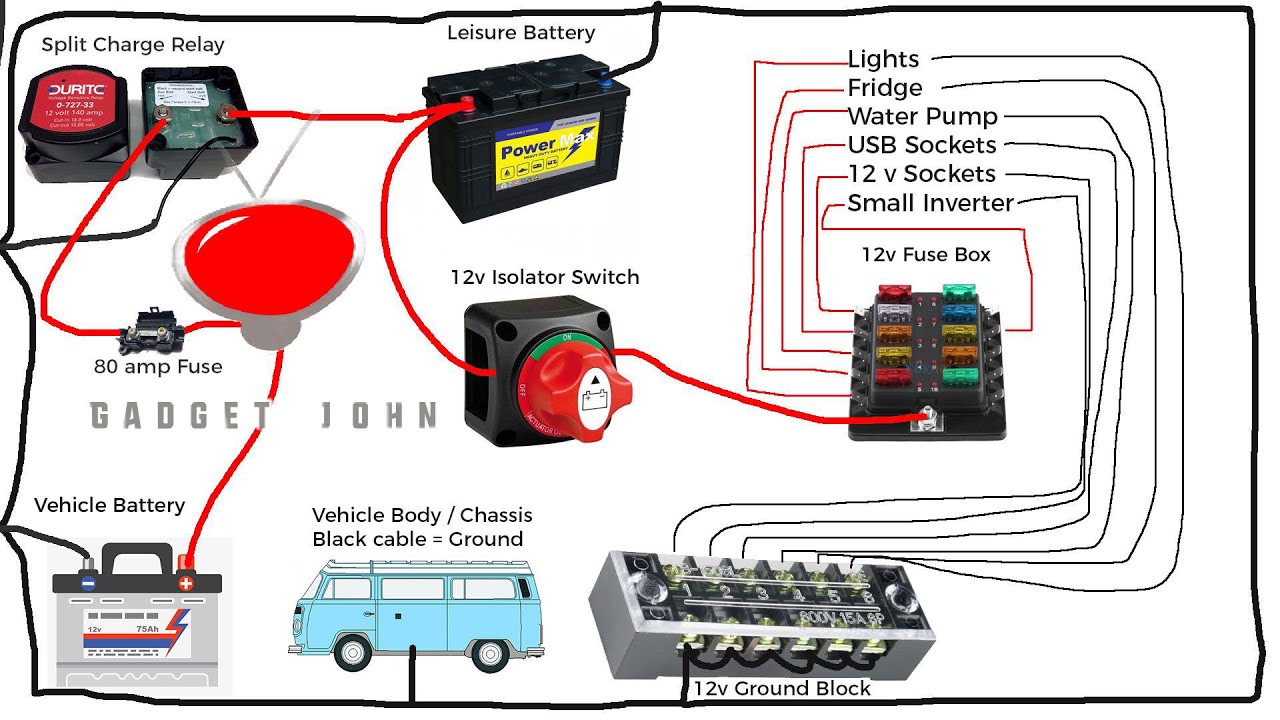
A typical battery switch setup involves connecting your house batteries and chassis battery to the switch, protecting each circuit with appropriately sized fuses. The following diagram illustrates a simplified version:Imagine a diagram with three main components: a chassis battery (labeled “Chassis Batt”), a house battery bank (labeled “House Batt”), and a battery switch (labeled “Battery Switch”). A positive (+) cable runs from the chassis battery to a fuse (e.g., 50A), then to one terminal of the battery switch.
Another positive (+) cable runs from the other terminal of the battery switch to the house battery bank’s positive terminal. This same cable also passes through another fuse (e.g., 50A) before reaching the house batteries. Negative (-) cables connect directly from each battery to the chassis ground, without passing through the switch. This ensures a safe and reliable ground connection.
The diagram should clearly show the flow of current and the location of fuses for protection. Remember to always use appropriately sized wiring and fuses for your system’s amperage requirements.
Step-by-Step Installation Instructions
Before beginning any electrical work, always disconnect the negative terminal from both your house and chassis batteries. This crucial safety step prevents accidental shocks and short circuits.
- Gather your tools and materials: You’ll need a battery switch (appropriately sized for your battery bank), appropriately sized wiring (typically 4 gauge or larger for house batteries), fuses (50A or as recommended by your battery manufacturer), wire connectors, crimping tool, wire strippers, a drill with appropriate drill bits, and safety glasses.
- Choose a suitable location: Select a location for your battery switch that’s easily accessible, well-ventilated, and protected from the elements. It should be close enough to your battery bank for easy wiring connections.
- Mount the battery switch: Securely mount the battery switch using appropriate screws and hardware. Ensure it is firmly attached to a sturdy surface.
- Run the wiring: Carefully route the positive (+) cables from the batteries to the switch and then to the load center or other distribution points. Keep the wiring neatly organized and away from moving parts or sharp objects. Use appropriate cable ties to secure the wiring.
- Connect the wires: Connect the wires to the battery switch and fuses using appropriately sized wire connectors. Crimp the connectors securely to ensure a reliable connection. Double-check all connections to ensure they are tight and secure.
- Connect the negative (-) cables: Connect the negative (-) cables directly from each battery to the chassis ground. This provides a reliable ground path.
- Test the installation: Once all connections are made, carefully reconnect the negative battery terminals. Test the switch to ensure it properly isolates the house batteries from the chassis battery. Verify that your RV’s electrical system functions correctly with the switch in both the “on” and “off” positions.
Common Wiring Mistakes to Avoid
Careful planning and execution are crucial for a safe and functional installation. Here are some common mistakes to avoid:
- Using undersized wiring: This can lead to overheating and potential fire hazards.
- Incorrectly sized fuses: Using fuses that are too small can cause them to blow unnecessarily, while fuses that are too large can’t protect your circuits from overloads.
- Poor wire connections: Loose or corroded connections can create resistance, leading to overheating and voltage drop.
- Neglecting ground connections: A poor ground connection can cause erratic electrical behavior and damage to your appliances.
- Ignoring safety precautions: Always disconnect the negative battery terminals before working on the electrical system.
Troubleshooting Common Battery Switch Issues
Battery switches, while seemingly simple, can cause significant headaches if they malfunction. Understanding common problems and how to troubleshoot them is crucial for maintaining power in your travel trailer. This section will guide you through identifying and resolving some of the most frequent issues.
Troubleshooting a faulty battery switch often involves a systematic approach. You’ll need basic tools like a multimeter to check voltage and continuity, and potentially a wrench to access connections. Remember to always disconnect the battery’s negative terminal before working on any electrical components – safety first!
Malfunctioning Switches
A malfunctioning switch can manifest in several ways: the switch may not turn on, it might feel stiff or unresponsive, or it may randomly switch positions. These problems usually stem from internal mechanical issues or corrosion. Visually inspect the switch for any obvious signs of damage, such as cracks or loose components. If the switch feels gritty or unresponsive, it may require lubrication with an appropriate electrical contact cleaner.
If the problem persists, replacement is often the most effective solution.
Blown Fuses
Blown fuses are a common indicator of a short circuit somewhere in your wiring system. A blown fuse will interrupt the power flow to protect your equipment and wiring from damage. Locate the fuse box associated with your battery switch (it may be near the switch itself or in a central location within your trailer). Check each fuse visually for a broken filament.
If a fuse is blown, replace it with a fuse of the same amperage rating. If the new fuse blows immediately after replacement, there’s likely a short circuit that needs to be identified and repaired by a qualified electrician before replacing the fuse again.
Corroded Connections
Corrosion on battery terminals and switch connections is a frequent culprit for poor electrical contact. Corrosion restricts the flow of electricity, leading to reduced power or complete failure. Clean the terminals and connections using a wire brush or sandpaper to remove any corrosion. Apply a corrosion inhibitor to prevent future corrosion. Make sure all connections are tight and secure.
Troubleshooting Flowchart
The following flowchart provides a step-by-step guide to troubleshoot a non-functioning battery switch:
Start: Battery switch not working?
Yes: Check the fuses. Are any blown?
Yes: Replace the blown fuse. Does the switch work now?
Yes: Problem solved.
No: Check for shorts in the wiring. Is there a short circuit?
Yes: Repair the short circuit. Does the switch work now?
Yes: Problem solved.
No: Inspect the battery switch connections for corrosion. Is there corrosion?
Yes: Clean the connections and apply corrosion inhibitor. Does the switch work now?
Yes: Problem solved.
No: Inspect the switch itself for damage. Is the switch damaged?
So, you’re planning a trip? Awesome! First things first: get yourself sorted with travel insurance. Check out Aon travel insurance for solid coverage. Then, if you’re an audiophile like me, don’t forget your tunes! Planning your audiophile travel setup beforehand is key for enjoying your favorite music on the go. Seriously, good headphones make all the difference.
Make sure you pack accordingly and have a great trip!
Yes: Replace the battery switch. Does the switch work now?
Yes: Problem solved.
No: Consult a qualified electrician.
No (from initial question): Check the battery itself. Is the battery charged?
Yes: Review previous steps.
No: Charge the battery. Review previous steps.
Battery Switch Maintenance and Care
Keeping your travel trailer’s battery switch in top condition is crucial for reliable power and to prevent costly repairs down the road. Regular maintenance ensures the switch operates smoothly and safely, protecting your batteries and electrical system. Neglecting maintenance can lead to corrosion, poor connections, and even fire hazards.Regular Maintenance Schedule for Battery SwitchesA simple maintenance schedule can significantly extend the life of your battery switch.
This involves regular cleaning and visual inspections to identify potential problems early. Ignoring these simple steps can lead to premature failure and potentially dangerous situations.
Cleaning and Inspection Procedures
Regular cleaning is essential to prevent corrosion buildup on the terminals and switch itself. Start by disconnecting the battery cables from the switch. Use a wire brush or sandpaper to clean the terminals, removing any corrosion, dirt, or debris. Inspect the switch itself for any signs of damage, such as cracks, loose connections, or overheating. Apply a corrosion inhibitor, such as dielectric grease, to the terminals after cleaning to prevent future corrosion.
Reconnect the battery cables, ensuring a tight and secure connection. This process should be repeated at least twice a year, or more frequently in harsh environments.
Corrosion Prevention and Lifespan Extension
Corrosion is the biggest enemy of battery switches. The buildup of corrosion on the terminals increases resistance, leading to heat buildup, poor connections, and potential failure. Preventing corrosion involves keeping the terminals clean and dry, using corrosion inhibitors, and ensuring proper ventilation around the switch to prevent moisture buildup. Properly sized and correctly installed fuses also prevent excessive current flow which contributes to heat generation and corrosion.
Storing the trailer in a dry environment during periods of non-use will also help to minimize corrosion. For example, if your trailer is stored outdoors, consider covering the battery and switch area to protect it from the elements.
Importance of Appropriately Sized Fuses
Using appropriately sized fuses is critical for the safety and longevity of your battery switch and entire electrical system. Fuses act as a protective device, preventing excessive current from damaging components. Using a fuse that’s too small will cause it to blow frequently, potentially interrupting power when it’s needed. A fuse that’s too large will not protect the circuit from overloads, leading to overheating, melting wires, and potential fire hazards.
Always refer to your trailer’s wiring diagram or the manufacturer’s specifications to determine the correct fuse size for your battery switch and other circuits. For instance, if your battery switch is rated for 100 amps, you should use a 100-amp fuse, not a 50-amp or 150-amp fuse. Using the incorrect fuse size can lead to serious consequences, including damage to your battery switch, other electrical components, and even a fire.
Battery Switch Selection and Considerations
Choosing the right battery switch for your travel trailer is crucial for safe and reliable power management. A poorly selected switch can lead to overheating, insufficient power delivery, or even dangerous electrical failures. This section will guide you through the process of selecting a switch that meets your specific needs.Selecting the appropriate battery switch involves careful consideration of several key factors.
These factors ensure the switch can handle the electrical load of your trailer’s systems without compromising safety or performance. Ignoring these factors could result in costly repairs or even hazardous situations.
Amperage Rating
The amperage rating of the battery switch is the most critical factor. This rating indicates the maximum current the switch can safely handle continuously. You need to determine the total amperage draw of all your 12-volt appliances and systems in your travel trailer. Add a safety margin of at least 20% to account for future additions or unexpected surges.
For example, if your total amperage draw is 100 amps, you should choose a switch with at least a 120-amp rating. Using a switch with a lower rating can cause overheating and potential fire hazards.
So, you’re planning a trip? Awesome! First things first: get yourself sorted with travel insurance. Check out Aon travel insurance for solid coverage. Then, if you’re an audiophile like me, you’ll want to think about your sound setup on the go. A good audiophile travel setup can really make or break your trip, ensuring you enjoy your favorite tunes wherever you are.
Don’t forget to pack your headphones!
Types of Battery Switches
Several types of battery switches are available, each with its own advantages and disadvantages. Common types include:
- Standard Battery Switches: These are simple on/off switches, typically manually operated. They are cost-effective but offer limited functionality.
- Rotary Battery Switches: These switches allow for selection between multiple batteries or battery banks, offering greater flexibility in power management.
- Remote Battery Switches: These switches allow for control of the battery from a remote location, providing convenience and accessibility.
- Electronic Battery Switches: These switches offer advanced features such as automatic shutoff, low-voltage protection, and remote monitoring capabilities. They tend to be more expensive but provide increased safety and control.
The choice of switch type depends on your needs and budget. A simple on/off switch might suffice for a small trailer with minimal electrical demands, while a more sophisticated switch might be necessary for a larger trailer with multiple battery banks and numerous appliances.
Manufacturer Reputation
Choosing a reputable manufacturer is essential for ensuring the quality, reliability, and safety of your battery switch. Look for manufacturers with a proven track record of producing high-quality products that meet or exceed industry standards. Read reviews and compare specifications from different manufacturers before making your decision. Consider brands known for their durable and reliable products in the RV and marine industries.
Battery Switch Comparison
The following table compares the features of several hypothetical battery switches from different manufacturers. Remember to consult the manufacturers’ specifications for the most up-to-date information.
| Manufacturer | Model | Amperage Rating | Type | Features | Price (USD) |
|---|---|---|---|---|---|
| BlueSea Systems | 7625 | 150A | Rotary | Multiple battery selection, positive/negative bus bars | $100 |
| Perko | 0544DP12V | 100A | Standard | Heavy-duty construction | $50 |
| Ancor | 26200 | 200A | Remote | Wireless control, low-voltage alarm | $250 |
Battery Switch and its Role in Energy Management: Battery Switch On Travel Trailer Function

A battery switch is more than just an on/off switch for your travel trailer’s battery; it’s a crucial component in effective energy management, directly impacting both battery lifespan and overall power consumption. Understanding its role is key to maximizing your off-grid adventures.Proper use of your battery switch significantly contributes to efficient energy management in your travel trailer. By disconnecting the battery when not in use, you prevent parasitic drain – the slow, constant discharge that occurs even when your trailer’s systems are seemingly off.
This drain, caused by things like clocks, alarms, and low-level electronic draws, can gradually deplete your battery, leading to a dead battery and potential inconvenience.
Preventing Accidental Battery Drain, Battery switch on travel trailer function
The most significant benefit of a battery switch is its ability to completely isolate your house battery from the rest of the trailer’s electrical system. This prevents unintended drain when you’re not actively using the trailer. Imagine leaving your trailer for a few weeks; without a battery switch, you could return to a completely drained battery, requiring a jump start or potentially more extensive repairs.
A simple flip of the switch prevents this scenario, ensuring your battery remains charged and ready for use when you return. This is especially important during extended periods of storage or when the trailer is not in use for several days. The switch acts as a safeguard, protecting your investment in the battery and preventing the need for inconvenient and potentially costly jump starts or battery replacements.
Conserving Battery Power and Extending Battery Life
Regular use of the battery switch contributes directly to longer battery life. Deep discharges are incredibly detrimental to battery health, significantly reducing their overall lifespan. By using the switch to disconnect the battery when not needed, you minimize the frequency and depth of discharges, keeping your battery in a healthier charge state. This translates to fewer replacements over the long term, saving you both money and the hassle of dealing with a dead battery.
Think of it as giving your battery regular “rest periods” – just like we need rest, so do batteries! This prevents constant low-level drain and keeps the battery from being constantly stressed.
Efficient Energy Management Strategies with a Battery Switch
A battery switch isn’t a stand-alone solution, but rather an integral part of a larger energy management strategy. Combining the switch with practices like using energy-efficient appliances, monitoring power consumption, and employing solar panels or generators maximizes its benefits. The switch allows you to selectively power specific circuits or systems as needed, further reducing unnecessary energy drain and extending the life of your battery bank.
For example, you can disconnect the battery completely while traveling, and only reconnect it when setting up camp. This targeted approach ensures that your battery is only used when truly necessary, thus extending its lifespan and preventing premature failure.
Safety Precautions When Working with Battery Switches
Working with your travel trailer’s electrical system, including the battery switch, requires careful attention to safety. Electricity can be dangerous, and improper handling can lead to serious injury or even death. Understanding and following safety precautions is paramount to ensuring a safe and successful installation or repair. This section Artikels crucial steps to protect yourself while working with your battery switch.Working with electricity presents several risks, including electric shock, burns, and fire.
A simple mistake can have severe consequences. The high voltage present in your trailer’s electrical system necessitates the use of appropriate safety gear and adherence to established safety procedures. Ignoring these precautions could lead to injury or damage to your equipment.
Personal Protective Equipment (PPE)
Proper personal protective equipment (PPE) is essential when working with any electrical system. This includes wearing insulated gloves rated for the voltage you’ll be working with, safety glasses to protect your eyes from sparks or debris, and sturdy closed-toe shoes to protect your feet. Long sleeves and pants made of non-conductive materials are also recommended to minimize skin exposure to electrical components.
Always ensure your PPE is in good condition before beginning any work.
Safe Work Practices
Before starting any work on your battery switch or the trailer’s electrical system, always disconnect the negative (-) battery cable from the battery. This isolates the system, significantly reducing the risk of electric shock. Never work on the electrical system while it’s energized. Ensure the area is well-lit and free of clutter to prevent accidents. If you’re unsure about any step of the process, consult a qualified electrician.
It’s always better to be safe than sorry.
Disconnecting the Battery
To disconnect the battery safely, use a wrench or pliers designed for battery terminals. Always disconnect the negative (-) terminal first. This is because disconnecting the negative terminal first prevents accidental short circuits that could cause sparks or damage to your electrical system. After completing your work, reconnect the positive (+) terminal first and then the negative (-) terminal.
Ensure all connections are secure before energizing the system.
Working with Tools
Use only insulated tools when working with electrical components. Make sure your tools are in good working order and free of damage. Avoid using damaged or worn-out tools, as these could increase the risk of electric shock or injury. Keep your workspace organized and free of tools or materials that could cause a tripping hazard.
Emergency Procedures
Have a fire extinguisher readily available in case of a fire. Know the location of your nearest emergency contact information and be prepared to seek immediate medical attention if an accident occurs. Understanding basic first aid for electrical shock can also be beneficial. Always work with a partner whenever possible, especially when working with higher voltages. A second person can provide assistance in case of an emergency.
Mastering your travel trailer’s battery switch isn’t just about convenience; it’s about safety and extending the lifespan of your valuable batteries. By understanding the different types, proper installation, and routine maintenance, you’ll ensure a smooth and worry-free power supply for all your adventures. Remember, safety first! Always disconnect power before working on the electrical system.
FAQ Explained
What size fuse should I use with my battery switch?
The correct fuse size depends on the amperage rating of your battery switch and wiring. Always consult the manufacturer’s specifications for the appropriate fuse size. Using an incorrectly sized fuse can lead to overheating and fire hazards.
My battery switch is stuck. What should I do?
Try lubricating the switch mechanism with a penetrating lubricant like WD-40. If that doesn’t work, you might need to replace the switch. A stuck switch could indicate a more serious problem, so it’s best to address it promptly.
How often should I clean my battery switch?
Inspect your battery switch at least twice a year, and clean it as needed. Corrosion can build up, impacting the switch’s functionality and creating safety hazards. Use a wire brush and baking soda solution to clean away corrosion.
Can I use a battery switch from a different RV?
While possible, it’s not recommended. Different RVs have different electrical systems and amperage requirements. Using an incompatible switch can damage your electrical system or create safety hazards. Always use a switch that’s rated for your RV’s specific needs.
